11.27.2011

Easy Potpourri Recipe

This is an easy, simple way to make your house smell amazing during the holidays (or anytime of the year). Great for a subtle aroma during holiday parties or gatherings.

Mix the following together in a large pot:
- fresh cranberries
- two oranges sliced in wedges
- cinnamon sticks
- 1 teaspoon vanilla extract
- add enough water to cover all items

Put on low heat and enjoy!

No Sew Ruffle Tree Skirt

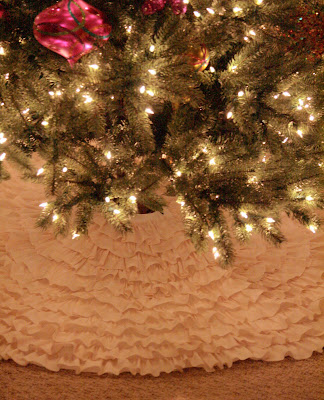
I did it! Or I should say, we did it! My mom and I made this no sew ruffle tree skirt I had been eyeing while we were visiting them for the Thanksgiving holiday. I saw a version on Better Home and Gardens and also an adorable one on Pinterest. I knew I had to make one for our family. Once we got the hang of the gluing, it was a pretty simple project. Time consuming but simple. And it was definitely easier having two people work on it. I am so excited about my new tree skirt!
My mom is a fabulous quilter and has lots of fun, useful sewing tools. We used her rotary cutter, cutting board and quilting ruler. Using her rotary cutter and quilting ruler made the cutting so much quicker and more precise. If you don't have them, scissors will work just fine.
We used a light weight twill for the base because it came in a wider width at 57 inches. We wanted our skirt to be 54 inches by 54 inches. We folded it in to a square.
And then in to a triangle. We had to cut the edge off to make it even.
Once it is an even triangle we cut off the top point to make the circle for the tree trunk. And then we rounded the bottom of the triangle. To make sure the bottom was even we measured from the top of the fabric to three different points and connected the line between to make sure each was equal distance from the top of the fabric. 
 We used this cute quilters Cotton for the ruffle. I love this snowflake print. We got 3.5 yards of this fabric.
We cut the selvedge off of the ruffle fabric to make sure the edges were clean.
We then cut our strips the length of the fabric. Each strip ended up being 3.5 yards long.
Two hands make this project much quicker and more it is fun having a buddy! I was the glue gal and my mom was the ruffle pincher. We made a pretty good team.
Ruffle one complete.
Getting closer.
Almost done.
Once we were done with all of the ruffles we glued grosgrain ribbon in three places on the under side of the skirt to make bows on the seam of the skirt.
Ta Da!
Right when we got home the skirt went under the tree. I am so happy with the finished product.

Happy NO Sewing!

11.25.2011

Weekly Pinterest Favorites


Quote - This is perfect. How cute would this be at a wedding.

Hydrangea - My favorite flower. We had white and green hydrangeas at our wedding. I love how simple and calm they are.

Winter Scene - Perfect capturing of the winter spirit. Love the twinkle lights. They make everything prettier.

Packaging - Cute idea for a stocking stuffer or a place setting. Each person sits down to a surprise!

Shimmer - Need I say more? Fabulous!

Champagne - Such a fun idea. Serve these as the bridal party gets ready. Or at any celebratory event. And the presentation is so cute!

Holiday Packaging - I love the pop of color on the traditional holiday wrap. And they did this all with school supplies. My holiday paper is usually on the less traditional side with lots of jewel tones and sparkle. Festive and fun, but different.

Snowmen Treat - Easy seasonal treat that looks adorable too! Marshmallows on a stick, dipped in white chocolate and decorated! Perfect for the littles at a holiday gathering.

Sprinkles Cake - As much as the holidays are on the brain, so are birthdays. Our twins birthday is December 23. I am always on the hunt for special ways to make their day special in the midst of the holiday craze. I love this cake. Maybe one pink and one blue!

Happy Pinning!

Christmas Ball Wreath

I have been wanting to make one of these wreaths for three years. Every year at Christmas I eye them in the store and always think how much fun it would be to make one. I had seen versions of this project many times using a coat hanger and ornaments. I thought it would be easier to glue the ornaments to a wreath. I love the way it turned out and it was a very simple project. Only took an hour and half total!
I bought my balls at Michael's. Disclaimer - this was not a "frugal" project. I saw a wreath just like the one I made at Target for $19.99. All of my supplies cost $48 (with my Michael's coupons of course). This would be a great plan ahead project. Buy your balls at the after Christmas sales and have them ready to make next year. This year the fun outweighed the frugal for me.
Remove the ornament toppers from all balls.
I bought all the same size balls (small, not tiny) but you could do a mix of any size. And I picked a mix of matte, glossy and sparkly ornaments.
This rounded foam wreath is the one to get. It is very dense. I first bought one of the white foam wreaths and it was too porous and the glue wouldn't hold the ornaments. This one was perfect. They have them in lots of sizes.
Get gluing!

 Put a line of glue, I used my hot glue gun, around the edge of the end of the ornament and stick it to the wreath. Hold for a few seconds. I started in a random pattern and then began to fill in holes and gaps as it got more full.
As your wreath gets more full you will start to glue ornaments to ornaments. There is no wrong way, just glue and place balls until it is as full as you desire.
Complete!

Happy Crafting!

11.17.2011

Top 5 Tips for Traveling with Kids

With the holidays quickly approaching and lots of people traveling near and far to visit loved ones, I thought a Travel Tips post would be helpful. With that being said, I should disclose that I just flew with my twin 22 month olds AND my 7 pound maltepoo (and of course the hubs) to visit my parents today. What I can tell you, we are all still alive. However, traveling is so draining. Add little people (and a dog) to the mix and we are wiped out! I will be heading to bed directly after completing this post. Tomorrow is a new (non travel) day and I look forward to rest and relaxation on our visit . . . until we have to board that plane again and do it all over to get home. Maybe we should consider this vacation location as a permanent home. Mhmmm. Something to consider.

Top 5 Tips:

1. PREPARE. PREPARE. PREPARE. - I cannot stress this enough. Confirm all travel arrangements - flights, car rentals, accommodations, important addresses and numbers, etc. Plan for who will take care of your home, mail, pets, etc. at home while you are away. Pre-pay any bills you need to pay while you are away. Gather all family members identification documents. I always travel with copies of my kids birth certificates because they do not have ID yet. All of these little things will eliminate day of stresses that you do not need to be worrying about. Trust me your kids will be stress enough.

2. LISTS - I am a HUGE proponent of lists. I live by my lists. I have a master list just for traveling with sections for each family member. I just add the quantity needed for each item depending on how long we will be gone, if there is a washer and dryer, etc. Once the item is packed it is checked off the list. Takes the thought out of packing!

3. PLASTIC BAGS - Yes. I am serious. I use them for everything! The Ziploc bags in all sizes.
What I put in my bags:
- an extra outfit for each child
- snacks
- diapers, wipes, smell good potty bags, a diaper changing pad
- kid set of plate, fork, spoon, sippy cup, bib
- my wallet, cell phone, lip gloss (I usually don't carry on my purse. I just slip those items in my all purpose (by all purpose I mean kid purpose) travel bag.
- used or dirty clothes, dishes
- garbage, diapers
I always pack extra bags because you never know when you will need them. And once you start using them you will find tons of uses. It is so nice to have everything in your travel bag organized and neat is separate bags. And nothing gets messy when you have wet or dirty items.

4. KID ITEMS - Pack snacks. And when you think you have packed enough, pack more. You never know how long you will be sitting on the runway. Lots of Goldfish crackers could be necessary. Pack age appropriate items for your little ones. Today in our travel bags we had busy bags with stickers and a notebook (big hit), flashcards, a few small books, their favorite small blankets and the iPad.

5. SENSE of HUMOR - Do not forget this at home! Regardless of how much you plan, I promise you something unexpected and not ideal will happen. Expect it. Kids get tired traveling too. And they can sense your stress. Maybe your child will lay in the middle of the concourse because he wants to nap, or maybe your dog will spot another dog in the security line and bark uncontrollably, or maybe your child will wet through their entire outfit. All of those things happened to us today. My husband looked at us and said, "we are THAT family." And we were. But we laughed, pretended like we weren't being embarrassing and were thrilled when our plane landed. And even if it is awful, most likely you will never see those people again.

Happy Travels!
Sparkle Candles

This was such a simple, fun project. Kids could do this as a fun craft project. And who doesn't love glitter and sparkles?
I found this glitter at Michael's. It was very fine, rectangle shaped glitter. Plain candles and double sided tape. I found some of my candles at Michael's and some at the Dollar Tree.
I love this iridescent glitter. It has been great with so many projects.
You just wrap the double sided tape around the candle in any pattern you like. Sprinkle on the glitter and you are done. I made my candles on a cookie sheet to try to contain the glitter. My house is still a bit shimmery but I don't mind.
My tree has lots of bright jewel tones so I thought the bright pink and green was perfect. I just picked my wrapping paper theme for the year and let's just say - the candle matches!
Traditional and festive red and sparkle.

Happy Glittering!

11.15.2011

Friends Getting Crafty


There is a little bit of craftiness in the air and I am so excited about it! Three of my favorite ladies did craft projects this week. They all fit in their creative time between busy schedules and each of them had so much fun crafting! I can't wait to have a "project" night at my house. See below for their features. Proud of you three!
Alis made an awesome birthday & anniversary rolodex. I love her sparkly divider pages. And the stickers and embelishments are so festive and fun!

Cate made fabulous place cards for her upcoming Thanksgiving dinner party. The turkey buttons are so cute and the paper she chose for the feathers is sophisticated and modern. I am sure these will be a hit at her event. She is hosting her first Thanksgiving dinner for over 20 people! We can't wait to hear all about it!
Les and I went to Michael's this weekend to find all the fixings for baby shower invites for her soon to be nephew's baby shower. She added a little sparkle to store bought invites and mailed blank colored paper to each guest with a instructions to write a piece of advice for the parents to be and to bring it with them to the shower. Les will assemble a special book with all of the tips and tricks and give it to the parents as a gift. Love this idea. Creative way to add to a little sentimental flair to the shower.

11.11.2011

Weekly Pinterest Favorites

Apparently I was a inspired by red this week. Maybe it is the upcoming holiday season. Whatever it is, I do enjoy red. A lot!


1. Monogram Ornament - I cannot wait to make this. I plan to do the first initials of all our first names.

2. Sparkle Bright Red Polish - Doesn't this just scream Christmas Eve? I don't know if I could pull it off but it just looks fun.

3. Twinkle Lights - Who doesn't like twinkle lights? They give a whimsical feeling to anything.

4. Packaging - I am loving the polka dots, checks and flat ribbons with adorable labels. I like the idea of no bows for my packaging this year. Simple, easy to stack, and fun with custom labels. We will see, I am a pretty big bow girl. So I don't know if I can go cold turkey. Stay tuned.

5. Palm Springs - Palm Trees? Yes. I am getting in the mood. We will be heading to the sun for part of the holidays and we are SO looking forward to it. Rest and relaxation here we come.

7. Stair Decor - I love everything about this. Makes me want to live in a country farmhouse with a huge stair case.

8. Snowball Martini - Delicious.

9. Yogurt Bar - Great idea for a shower. Make your own yogurt parfait with fruit. Yum!

Happy Pinning!

11.10.2011

Button Ornament

I already have holiday fever. Big time. I went straight from Halloween to all things Christmas in a heartbeat. I am so excited for the season! Having kids brings back the extra magic the holidays held when I was a child. This is my first official Christmas project of the year. I saw a picture of an ornament on Pinterest and I knew I wanted to make something similar. 

Disclaimer - this project is VERY simple, but it does take some time. Be patient and you will have a fabulous finished product to admire. 
I bought two packages of pearl push pins. I should have bought three. I ran out and had to use some extra pins I had in my craft closet.
I bought a variety of buttons at Michael's. You can do any color combination. I wanted mine as colorful and jewel toned as possible to go with my tree. And the Styrofoam ball. They had three different sizes options.
Lets get pinning! I did two buttons for every pin. A bigger one on the bottom with a smaller different colored button on top. And then you just pin away!
I tried to keep the buttons as close together as possible and sometimes I overlapped a few to cover up as much of the white ball as possible.
I also used tiny buttons to fill in any holes between buttons. You could paint you ball before you start to avoid while showing through also.
Ta Da! I love how it turned out. Festive, fun and colorful! Perfect combination.
I attached a polka dot ribbon and tied a bow. I adore polka dots. I used superglue under the ribbon to make sure it stayed in place.

Happy Crafting!

11.05.2011

Christmas Decor Organization

If you are anything like me, when it comes time to put out your Christmas decor you are so excited to get it up, nothing can get in your way. And when it is time to put it away at the end of the season, you just want the project over and everything back in its place. For the last few years I have been unhappy with our decor storage and I knew there were some items in our collection that weren't being used any longer but I hadn't set aside the time to come up with a solution.

Today was the day I decided to fix the problem. I started by heading to the Container Store - an amazing store if you haven't been. I could spend hours there. Easily. I bought two of their ornament storage boxes and headed home to start my project. I pulled out all of our Christmas bins (red and green to keep with the feel of the season) and started going through each box. I put the ornament bins aside until the end.

First step - I emptied each bin and made two piles, one for items we would keep and one for items we haven't used in the past few years. Next step, I listed the items to keep in each bin on a master decor organizer list. Click here for the template I used. This is a great website. There are tons of free templates, lists, planners and more, all to help you stay organized during the bustling holiday season. After I completed the list, I numbered the bin according to the list and packed the box.

Next Step - I emptied all of the ornament boxes and put all of our ornaments in the new bins I purchased. I was able to get rid of so many little Hallmark boxes and other containers the ornaments had been stored in. It freed up a ton of room.

Final step - We packed up the decor items our family was done using and dropped them off at the Salvation Army. Project complete!

Now we are all set for decorating when the time comes. And in my house, the time comes sooner than later! I love having the decorations up right around Thanksgiving. Now we have lists of what goes in each bin and everything is neat and tidy. It will be easy to put the decor up and even easier to put it away. Yay!

See below for details of the decor organization makeover.

Pictures from top left.
1. New bins from Container Store.

2. AHHHH! My guest room mid project.

3. My Woof Poof. I included a picture of him just because I am starting to feel the holiday **spirit **!

4. Decor Storage Inventory List

5. Bins - Project completed, bins stacked and labeled!

6. Ornaments going in the new bins.

Happy Organizing!

Birthday and Anniversary Organizer

I saw this fabulous idea on Pinterest and just knew I had to make one myself. (See inspiration here.) I bought a basic model Rolodex and used the divider cards as patterns for my dividers. I used scrap book paper in multiple colors, sparkle letter stickers and fun party stickers to add some flair. I made a divider for each month and one card for the front. For the event cards I bought a package of blank Rolodex cards.

I started my Rolodex by adding a card for each birth date or anniversary of people special to me and my family. Some events shared the same date. I listed them both on one card with the date in the top corner of the card - just month and date. Next to the person's name I put the year. This way I can add as many events as I need to on each card. As I need to add new birth dates and anniversaries I can add a card if there isn't an event already added with the same date.

It was a simple, quick project that I hope will help me stay on top of important dates.

Happy crafting!

11.03.2011

Weekly Pinterest Favorites

Check out my favorite pins of the week!


1. Birthday Rolodex - I LOVE this idea. Perfect way to organize birthdays, add to it each year and you can make it pretty to look at while it sits on your desk. It would also be a great gift for someone. You could fill in family birth dates for the person to get them started. I am going to make mine with anniversaries also. And with all of the friends who are pregnant or getting pregnant, I will be adding lots of new BIRTH days too! Yay!

2. Vintage Holiday Dress - I am a sucker for little girls dressed up in classic holiday attire. My mom started the tradition of buying my little ones their holiday outfits each year. Think lots of plaid, vests on him, smocked dresses on her. Oh, the holidays. We cannot wait for you to arrive so we can get in those outfits!

3. Shimmer Shimmer - Doesn't this make you want to celebrate? Or craft? Or just smile? The colors are amazing. I do love color. And anything glittering and sparkling draws me in. I have a new board dedicated purely to the shimmer. It is pretty fun. Click here to see the sparkle that inspires me.

4. Button Ornament - This looks fun and easy and the finished product is adorable. Can't wait to try it.

5. Always.

6. Up do - Very classy. I really like twist coming down across the back. Elegant.

7. Peonies - Always a favorite. Clean and pretty.

8. Holiday Potpourri - I can almost smell this just looking at it. I am getting so excited for all things holiday!

Happy Pinning!

Halloween Party - Toddler Style!

 We did it. We threw our first official "kid party" at our home. Our twins first birthday party was at Gymboree. It was amazing. We went to the party, they entertained the kids, they kept the party flowing, they served cake and then they cleaned up. I almost felt like I was cheating, it was so easy! I figured we needed to jump in to the party scene and what better way to start than with a Toddler Halloween Party?

We had 10 little people under the age of three and 22 adults. It was wild but so much fun. The two most important lessons I learned through this party experience - 1. An hour and a half party is PLENTY long enough when dealing with toddlers. 2. Once the party gets going, messes will be made, things may not turn out exactly how you envisioned, but remember to enjoy it.  Take a deep breath and sit back and enjoy the smiles on your little ones' faces. Absolutely priceless.

I enjoyed finding ideas for toddler friendly activities and I loved creating the decor to add special touches to the party. As always I found lots of ideas online and in magazines and then I tweaked them to create exactly the decor I pictured for our party. For activities we had a craft table, cookie decorating, a photo booth and Pin the Nose on the Pumpkin. Below are a few of the decor elements of the party.


1. Centerpieces - I used vases we already had and filled them with jelly beans and gum drops. Tied ribbons around the sucker stems and ta-da! Centerpiece complete. It is a perfect height for table decor.

2. Milk Carton Ghosts - Love this simple project. We saved our milk cartons for a few weeks. The twins still drink A LOT of milk! Draw faces on the clean milk cartons with black permanent marker. Spray paint the lids black. The inspiration I found showed a string of holiday lights in each milk carton to light them up. Instead I added glow sticks from the dollar store. During the day, you couldn't see much glow but at night they all lit up in different colors. It looked fabulous! BOO!

3. Party Favors - I stamped BOO on each bag and tied with a simple knot. Super easy. Favors included a small bag of goldfish, box of raisins, sheet of Halloween stickers and a container of Play Doh.

4. Photo Booth - This was SO fun. Everyone at the party went in the photo booth multiple times. We bought a bale of hay at the local feed store. I am a complete city girl and had no idea how huge a bale of hay was! It only cost $6.50. Bargain! We add a fabric backdrop, a scarecrow, cornstalks and a pumpkin to get the full harvest feel. After the party I got the pictures developed and am mailing them to the party guests with a thank you for coming note from our twins. The photo booth idea could be used at any festive event.

5. Sparkle Bottles - We had two crafts for the kids. Decorating foam pumpkins and spiders and making Halloween themed sparkle bottles. The picture is of the items for the sparkle bottles. Such an easy, fun project and my kids play with their sparkle bottles all of the time. Quick tip - the black bowls the craft supplies were in were yogurt cups. We washed and saved yogurt cups and spray painted them black to go with the orange and black theme.

6. Ghost Names - We made ghosts with each child's name who was invited to the party. It is an extra special touch and fun for the little ones who recognize their name to see it up on the wall. The little girl ghosts even had bows in their hair! You could do this for any holiday or theme party.

7. Beer Cooler - My husband carved out the pumpkin, and then put ice and beer in. High impact decor with little effort.

8. Invitations - These were simple store bought fill in the blank invites. I added a little rhyme letting them know it was a costume party and glammed it up with background paper and a puffy pumpkin sticker.

Below are some of the food elements of the party.

1. Main food table - I tried to come up with food that was easy to eat while chasing after your little ones. Plus the party was in the late afternoon so snack foods were the most practical.


3. Cheesy Pumpkins - I used a pumpkin cookie cutter to cut out cheddar cheese slices. It was so simple and everyone gobbled them up. I love when people actually eat at parties! You could do the cheese idea with any cookie cutter shape.

4. Beverage Table - Always serve a variety. We did beer, wine, soda, bottled water and milk and chocolate milk for the little ones. I had labels in front of all food and beverage items. Chocolate milk was Bat Milk. Wine was Dracula Juice, cinnamon squares were Spicy Devils. It was an easy extra touch and everyone was talking about the fun names.

5. Giant Candy Corn Cookie - Yum! We made a huge sugar cookie and frosted it with different colors to get the full candy corn effect.

6. Skeleton Fingers and Spooky Toddler Trail Mix - Orange, red and yellow bell peppers cut into sticks and put in cups with veggie dip at the bottom. One of the best ideas. No double dipping and a so easy to eat and no mess! The trail mix was just goldfish and raisins - two kid friendly foods in Halloween colors. EASY!