2.17.2012

Quick Organizing Tips

Here are two quick, simple organizing tips. I implemented both at my house last weekend and can honestly say I am loving both changes! Try either or both of these ideas and let me know what you think. I saw both tips on Pinterest (where else?).

TIP - ADD A RECYCLE BIN UNDER THE SINK
We try to recycle but it seems the recycling builds up next to the sink - cans and flattened cardboard packaging that needs to be taken out to the garage to the big recycle bin. The constant pile (and when I say constant, it was taken out multiple times per day but still) was driving me crazy! We removed everything from under the sink other than the dish soap, garbage can, fire extinguisher and we added another can designated for recycling. I love having it there. It is so easy to use and I find I am actually recycling more than I was before because of how convenient it is. Once the bin is full, we take the whole thing to the garage and empty it. Loving it!

TIP - USE A SHOE RACK TO HOLD CLEANING SUPPLIES
Once we removed everything the sink, I quickly needed a new place for our cleaning supplies. I had seen this on Pinter and ran to Target and bought this over the door shoe rack. They had three different kinds but the other two were fabric. This one is plastic and I figured it would be easy to wipe down if anything spilled on it.

I was a little nervous about two things - 1. Would the bottles fit? and 2. Would my little ones be able to reach the supplies? All of the bottles, even the thicker ones, fit perfectly. And my little ones cannot reach up to where the bottles start so it is perfect. I didn't have enough bottles for the whole thing so I added our rubber gloves, extra sponges, magic eraser, etc. I put ours on the back of the door in our laundry room. It is right off of the kitchen and a perfect location.

In the last week I have found it is so much easier to grab one of the cleaners from this organizer than it ever was before under the sink digging around looking for items. I am thrilled!

Leave a comment with a simple, organizing tip you have implemented. I am always looking for new ideas!

Happy Organizing!

2.12.2012

Easy, Fun Valentine Ideas with Toddlers

One of the things I enjoy most about the holidays is sharing them with my kids. I am enjoying celebrating the holidays so much more experiencing it through my little ones eyes. It brings a whole new level of excitement to the experience. Below are some of the Valentine activities we have done in the last few weeks in preparation for the big love day. Many of the ideas are so easy, they just take a few minutes but all of them have been enjoyed. Happy Heart Day!

1. Painting cut out paper hearts in Valentine's colors. Washable paints are always fun!
2. This idea came from Pinterest. We traced their little hands, had them color the cutouts and then make the "This Much" accordion. They made these two weeks ago and are still running around with them.
3. Decorating their Valentine Mailboxes. Mine are still too young to create their own mailboxes so I purchased foam ones at Michael's. I also saw them at Target. We used glitter pens and lots of stickers.
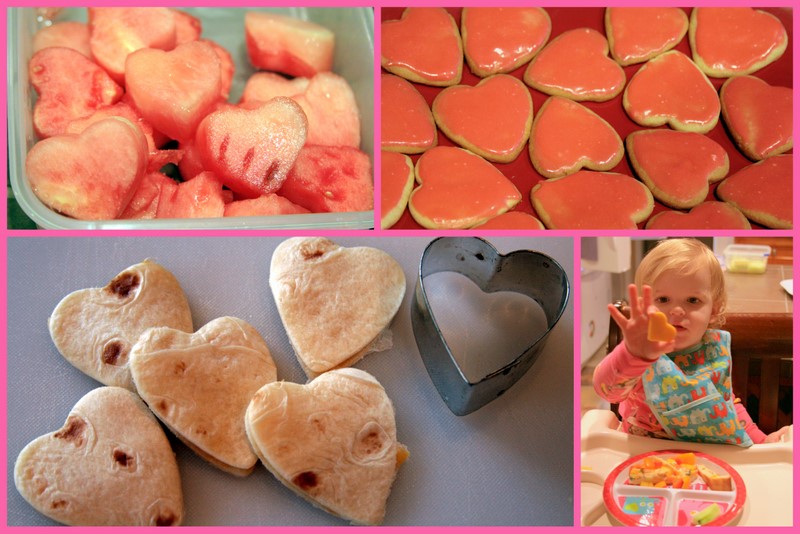
 4. Decorating Valentine Cookies. Sugar cookies, frosting and sprinkles. Always a hit!
 5. Making your own Valentine's. This is always a special activity and the receivers appreciate the gesture so much! My twins are just 2 so they colored (scribbled) all over the cards and then I added the hearts they painted earlier in the week to the front and wrote a message to each of their friends in the inside. We also added stickers.
 6. Snow globes. Another idea from Pinterest (best site ever!). They loved this project. You can add any small items you have to the jar. We did small plastic jewels, marbles, lots of glitter and Valentine themed figurines they picked out at Target. We used applesauce jars and super glued the lids closed.
 7. Heart shaped food. We have done melon, cantaloupe, sandwiches, quesadillas, cheese, cookies and apple slices. You can do anything. Just punch it out with a cookie cutter. They think it is so fun eating shaped foods!
8. Decorating foam hearts. I found the hearts at Michael's. You could do paper hearts too. They decorated them with stickers and we hung them above their craft table for festive decor.
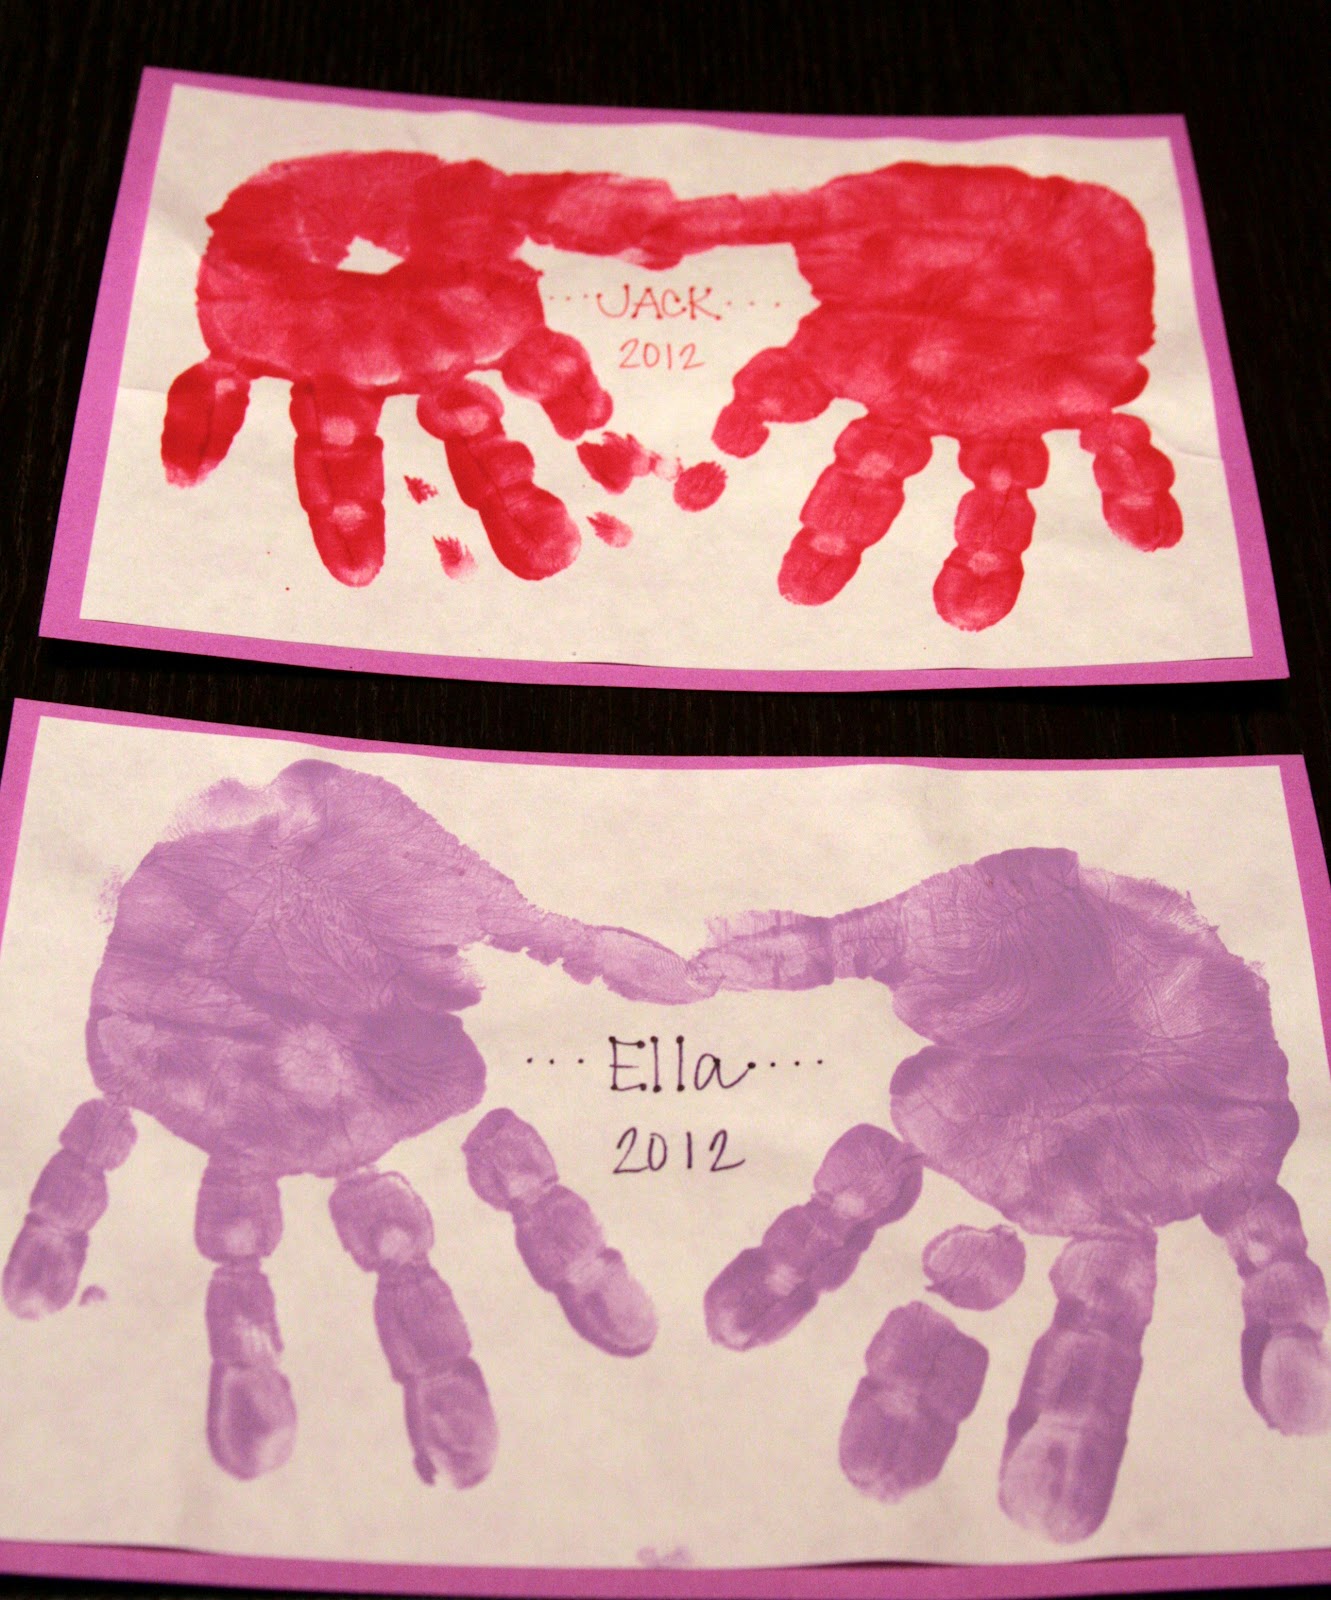
9. Hand print hearts. I love these. So simple and sweet. We did these on plain paper and I mounted them on card stock and we sent them to their grandparents. Such a sweet keepsake showing how little their hands once were.
10. Cupid Kisses. We made these at Christmas with Rolos and they were delicious. This was another version with Hershey's chocolate hearts. The little ones helped me unwrap the chocolate and place the hearts on the cookie sheet. They sampled a few along the way! Oven at 275 degrees for three minutes on the top rack. Remove and push the M&M's into the chocolate. Put in the fridge to chill. Enjoy!
11. Last but not least - take them to mail their Valentine's at an official US Mailbox. My twins thought this was SO fun.

Happy Celebrating!

1.31.2012

Balloon Birthday Surprise!

Our twins birthday is December 23. I think this is possibly the busiest day of the year. There is always the hustle to get all last minute things done before the holiday actually begins on this day. Plus it isn't ideal to have your birthday so close to Christmas, especially when you are a kid. But it is what it is and so we are making the best of it!

I wanted to do something special for their day and really make their birthday stand out. Our entire house is decked out in Christmas decor so we needed to go big. I found a fabulous party decor website on Pinterest - Polka Dot Market and ordered balloons, frilly streamers, paper lanterns and custom cupcake toppers. They were so prompt and their products were awesome. I will definitely be using them again. Check them out if you need party supplies.

We rented a helium tank from our local party supply company and after the little people went to bed we went wild decorating. It turned out so great and they thought it was amazing the next morning. I am so glad we put in the extra effort to make their 2nd birthday extra special. I had as much fun with it as they did, we will probably do this or something similar each year!

Here are links to a few ideas that inspired me -  Waking up to balloons in your room and covering the bedroom floor with balloons. My only issue with this was I didn't want to go in their actual room for fear I would wake them. I wanted them to sleep! That was why we decorated OUTSIDE of their room. See below for pics of the finished product.
Some of the goodies from Polka Dot Market. Polka dots make everything more fun!
Balloons, balloons, balloons.
We attached balloons to their toothbrushes. They loved this.
We put bunches of balloons any where we could.
We decorated Twin Town with streamers and lanterns and of course more balloons.
They had party hats waiting for them on their high chairs with streamers and more balloons.
A little bit of Christmas and a lot of birthday! It was a success!

Happy Celebrating!

Crock Pot Tortilla Soup

A few months ago I found a recipe for tortilla soup on Pinterest and we tried it and it was OK. Not great. We have made the soup 4 different times now and each time my husband (he is the cook in our house) has tweaked the recipe, added and subtracted ingredients and basically made it his version of tortilla soup. We finally have a winner. He and I both love it and the twins thought it was great. Our daughter even told us the soup was delicious! And the best part . . .  you put it in the crock pot in the morning and do not touch it until dinner time. Tasty and easy - bonus!

Ingredients:
1 onion diced (no red)
1 red pepper diced
1 jalapeno diced
2 cloves of garlic minced
1 can black beans rinsed
1 can corn (not rinsed)
1 can tomato sauce
1 can cream of chicken soup - we used Campbell's
1 can cheddar cheese - we used Campbell's (this makes all the difference)
1 teaspoon chili powder
I teaspoon cumin
32 ounces chicken broth
1/2 cup corn flour/meal
2 chicken breasts

Put all ingredients in the crock pot, turn it on low and let it go all day. We garnished with green onion, cilantro and shredded cheese.

Another trick to save even more time - double the amount of chopped/minced items and freeze half to use later. You can throw in the frozen contents, add everything else and start the crock pot just the same.

Happy Soup Time!

1.19.2012

Taco Soup - Quick and Easy!

I love Mexican food. And this soup is no exception. This recipe is a staple in our home. We usually make this once a week. It makes a lot and the leftovers the next day are just as good as the first round. We can put this together in under 5 minutes prep time and it is done on the stove within 15 minutes. We have made it for lots of friends and family and it is always a hit. Wait until you see how SIMPLE it is!
Ingredients:
  • 1 can black beans
  • 1 can pinto beans
  • 1 can corn
  • 1 can tomato sauce
  • 1 can enchilada sauce (optional)
  • 1 small can diced green chili's
  • 1 packet of taco seasoning
  • 1 packet of ranch dressing seasoning

Directions:
Put all canned ingredients in a large pot. Do not drain, add the entire contents of the can in the pot. Add 1 can of water. Bring to a boil, stirring occasionally. Once it is at a boil, add taco and ranch seasoning packets. Let simmer 10 minutes.

Garnish with your favorites. Some ideas - light sour cream, shredded cheese, crumbled tortilla chips, diced green onion or chopped tomato. For a more hearty soup you can also add ground beef or turkey or shredded chicken. And you can substitute any type of beans. We just prefer the black and pinto beans at our house.

Hope the soup keeps you warm. Happy cooking!

Weekly Pinterest Favorites

I am thrilled Pinterest has fixed their counters and activity logs. I love the up to the minute updates. I am always looking for new,creative and interesting pinners to follow. Leave a comment with your user name and/or a user name of a pinner we should follow. Let's get pinning!

From top left:
  •  Closet - I have been obsessing with closet organization lately. I would love to have an entire closet room with a center island. Ooh la la. It would be amazing!
  • Paper Bows - Sometimes the packaging is more special than what is inside.
  • Nave Stripe Skirt - Need I say more? Adore it!
  • Dark hardwood floors - I love this look. And the distressed floors are so cool. Definite possibility in our next home. They will be perfect for wear around the house with little kids running around.
  • Quote - Good to remember. You are the only one who can be you. Do it well.
  • Ruffle Cake - Perfect for a little girl party or a baby shower. The ruffles are perfect.You could do an entire ruffle theme!
  • Pink Cookies - Again perfect for a little girl party, bridal or baby shower. I like the monogram idea. Personalized touches are so special.
  •  
    Hope you are all enjoying your weeks. Happy Pinning!

1.12.2012

Operation - Pantry Redo

What better day to reorganize the pantry than the day after Christmas? I redid all of the kids toy organization, redid the pantry and then put away Christmas. It was a day and I was exhausted but elated with all of my accomplishments!

I have been getting antsy about my pantry for the last few months. As the holidays approached more and more packages, boxes, bags, etc. began to fill up my pantry. Nothing seemed to fit easily and the whole pantry was getting crowded. Solution - operation redo the pantry.

There were a lot of sales at Fred Meyer/Kroger on their kitchen storage items right after the holiday. The storage containers can be really expensive but I figure if you can find them on somewhat of a sale and you take good care of them, they will last for a really long time. Bottom line, they are worth it.

I bought most of the OXO brand (more expensive) and some of the Snapware (way less expensive) brand. After I was done with my project, I found out Costco has a box of 30 pieces of Snapware for less than $30. If you are in the market for a pantry redo, head over to Costco!
My empty bins just waiting to be put to good use. Plan out what shapes and sizes you are looking for before you go to the store. Think of things your family eats regularly (the staples) and shop for bins that will fit those items.
One of my favorite parts of the redo - my expanding stair step canned food organizer. I love it! We make taco soup once a week in our home. It is one of our absolute favorites. It requires a lot of cans plus we have cans for soup, beans, etc. This makes it so much easier to organize and see what we have.
I bought open baskets to contain like items that didn't fit in a storage container. This bin is filled with all things sweet. There are way more of these sweet items in the house because of the holidays.
Another open basket is filled with paper plates, napkins, utensils, cups ans straws. It is easy to grab the basket and grab exactly what you need.
One of my favorite tips is to group like items together. It makes sense and it makes your life so much easier. I bought two smaller plastic bins with lids to hold baking items. One holds sprinkles, colored sugar and decorative icing and gel.
The other bin holds baking chocolate, chips, Hershey kisses, etc. These items aren't used on a daily basis and it is nice having them contained in a small box. Plus with the lid, they are easily stacked.
The baking bins are stacked to the far right. Next to those are items like brown sugar, powdered sugar and white chocolate chips (we use a lot of those at our house!) in Snapware containers. There are some long plastic open bins that are perfect for holding items that you need access to but that you want contained - boxed cake mixes, marshmallows, jello and cornmeal. And finally to the left is a bin of sauces. The baking items are on the lowest shelf because they aren't used as much as some of the other daily items.
The next shelf up, still fairly low, is the twin shelf. They are just two and require lots of their own plates, bowls, cups, silverware in mini size and some snacks. I have all like items contained in bins. One bin of sippy cups, one of plates and bowls, spoons in one container, forks in another and snacks in even another.

I have had these bins since they were born and this shelf has evolved with them over the last two years. We have switched from all bottles and sippy cups to place settings and utensils. I am sure it will continue to evolve with them. I make sure as soon as we are not using things any longer, we move them out and regroup with the next phase. It helps keep things clutter free makes it easier to navigate saving you time.
I used open baskets to contain items like bag soups, mac n cheese, Mexican rice boxes, etc. The OXO containers on this shelf hold snack items - raisins, crackers, yogurt covered raisins, Ritz crackers and graham crackers. To the far right are four containers with different types of dried pasta.

Once the containers are empty they can be cleaned and either filled with the same item as before or whatever new items you have. I didn't label any of my bins because you can see the contents of each of them and it allows you to change the out at any time.
The top shelf holds the tallest, largest bins with things like cereal, chips and pretzels. Bigger bulk items. I also use a tall bin for saltine crackers.
TA DA! Complete! I am thrilled with the final redo. It is easy for our family to use and saves us time. If you are in the market for a pantry redo, I hope you got some inspiration. If you have any pantry organizing tips, leave a comment. I would love to hear them!

Happy Organizing!